![[diagram of bookcase]](Cherry-bk-flat.gif)
This is a modest-sized bookcase, with a few drawers along the top to make it interesting. It is approximately 36" tall, by 36" wide, by 11" deep (give or take a bit). There are three drawers across the top edge of the unit, . Each drawer is about 5" tall, by 10" across, by 10" deep. The drawer fronts sit flush with the case. The top of the bookcase overhangs the front and the edges by about 1". There are two open shelves below the drawers, spaced about 12" vertically apart.
The diagram along the right, while not to scale, and also not 3-d (hey, I got lazy ok?), should give a fair idea of what the unit will look like. When the unit is complete, I will be adding in one or two photo's to the bottom of this page.
The majority of the bookcase is constructed from solid cherry. The drawers ride upon a pine frame, hidden behind a cherry trim piece. I chose to leave the back of the bookcase open, though it would be trivial to add a 1/4" sheet of cherry veneer plywood. In fact, as I built the piece I rabbeted the back edge to make room for attaching a back, so that I would not have to decide until the very last moment. Since I did omit a back, I added a 2"x1" reinforcing strip below the rear edge of each shelf. The reinforcement is probably unnecessary, as the finished cherry is almost 7/8" thick, but I figure it's better to be safe than sorry. I did put a 1/2" plywood back behind the drawer section.
I don't have the space or the funds to maintain a large stash of lumber. Also, since I've only been pursuing this hobby for a few years, I haven't had the time to accumulate much of a lumber pile anyway. I've just been buying lumber when I needed it. About 6 months prior to commencing this project I had come across a deal for some hardwood, and had picked up about 20 board/feet of very fine cherry. That was my first experience at buying wood "on spec", so I trust you'll forgive me if you find that a piddling little amount. Since then I'd been pondering various means of putting the wood to use. This project is the end result.
Construction Details:
(These thoughts were recorded in sort of chronological order, as the unit was built)
The cherry was rough lumber, and I had neither a thicknessing planer nor a jointer, whether hand-powerd or electric. Fortunately I have a few friends and I went over to one of them one evening to thickness and joint the boards. The results were quite nice. However, as my first experience using a jointer, the results were not perfect. Therefore I later pulled out my #5 Jack plane, and used it to hand-joint (just some fine tuning really) a few of the edges before I glued up the wood into wider boards.
After glue-up, I continued my handplaning by using a #4 smoothing plane on the surface. This removed any difference in height at the joint. I didn't want to impose on my friend with the thickness planer any more, otherwise that would have been an alternative to using the hand plane. I had mixed results. I'm still learning. When the planing went well, the resulting surface was like silk, when it was bad, I reached for the 80-grit paper to sand out the gouges, lines, and tear-out. ... Sharpening and tuning a hand plane are still areas of growth for me.
The shelves were set in dado's in the bookcase sides. I cut the dado's using a router and straightedge, and lots of fiddling with clamps. I have plans for a elegant dado'ing jig from an American Woodworker Jig Book, which I perhaps should build before the next time I have to fiddle with clamps.
I fastened the top to the sides via screws, in sloted holes to allow for wood movement. Here's one area where I'd like to improve my technique and figure out something more elegant.
The drawer boxes were assembled out of plywood. Ok I admit it I cheaped out here. Next time I'll do dovetails in solid wood, I promise! (maybe)... The drawers slide on some pine "webbing" which is also set in dado's in the side of the carcase. A narrow piece of cherry sits along the front to hide the pine.
I made my own knobs for the drawers as follows: I cut rough circles out of some of the scrap cherry. Then I put a screw into the center of the circle, cut off the head of the screw, and chucked it into my drill. I then mounted the drill in the vise, turned it on, and used wood rasps to round off the circles into a knob shape. Hey, when you don't have a lathe, you have to improvise! It's also a nice way to get knobs out of cherry. I looked through a few catalogs and the knobs were all either oak, or something like brass, porcelain, and the like. The knobs resulting from my efforts were not perfectly identical, perfectly round, or without flaws, but I kind of like the way they add to the handmade flavour of the piece.
The drawers in my unit were pretty small, but I wanted to put them in anyway. It just so happened that they were almost square. As in, the sides and the front/back were almost the same length. Big mistake. When cutting out the pieces and rabbeting them, I got mixed up on which was the sides and which was the front, and ended up ruining 3 pieces. This is frustrating not only for the time and wood wasted, but also for accuracy. I like to rip all the pieces at the same time, without moving the fence on the TS, so I know that all the pieces are exactly the same width. Ditto for crosscutting, I set up a stop block on my sliding cutoff sled and cross cut all the pieces so that they are exactly the same length. After a mistake like this I have to come back and set up the TS to rip and crosscut some more pieces. Sure I'm careful, but there's bound to be at least a small margin of error compared to the first pieces.
For a finish I chose to use Shellac (Orange Shellac). I've heard a lot of good reports on this finish. I based most of my shellac technique on an excellent article by Michael Dresdner in the August 1997 issue of American Woodworker (Pg 78). I have two very positive first impressions of shellac: First, the odor is almost unnoticeable, which made for a very pleasent job. Odor is a very important factor to me, as my finishing is done in the basement, in fact due to space constraints I usually do my finishing in an open corner of the family room. Second, I have never in my life gotten a paintbrush as clean as I did after using shellac. Rinse the brush in the solvent (alcohol) and clean it with just plain soap and water and finally wrap it in brown paper (from a paper grocery bag). The results was a silky clean brush, and no noxious chemicals to worry about. Assuming that the finish is pleasing, I will definitely be making more use of this stuff! On the 'negative' side, shellac sure is thin and runny, it takes some getting used to in application technique. I've tried mixing varied thicknesses. After applying several coats I still have trouble with dribbles running over the edges. Fortunately I can just soften the drips with some alcohol and smooth them into invisibility.
This is supposed to be a small bookcase. It's just 36" tall, by 36" long, by 11" deep. But Ooof! it sure is heavy to hoist around. I see that 3/4-7/8" thick cherry boards do add up quickly to a heavy unit.
 I cut notches in the bottom of each side in order to give the
bookcases 4 feet instead of just two. There is a non-scale diagram
of what I mean to the right of this paragraph. I first drilled
the corners out using a large bit, to give a curve to the corners,
and then cut the rest by hand. I suffered a bit here from 'wander'
as I cut with my coping saw. Fortunately it's close to the floor
where it's hard to see. Here's another area where I could stand
to discover a better technique.
I cut notches in the bottom of each side in order to give the
bookcases 4 feet instead of just two. There is a non-scale diagram
of what I mean to the right of this paragraph. I first drilled
the corners out using a large bit, to give a curve to the corners,
and then cut the rest by hand. I suffered a bit here from 'wander'
as I cut with my coping saw. Fortunately it's close to the floor
where it's hard to see. Here's another area where I could stand
to discover a better technique.
Photo Gallery
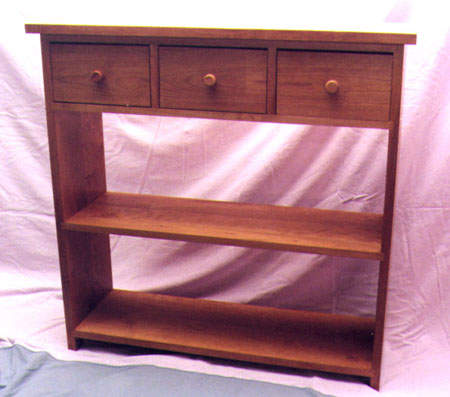
(At the time of the photo, one or two more coats of shellac
are still required, and then some wax)
I wrestled with the scanner and with Adobe Photoshop for a while
and still don't think this image is a faithful reproduction of
the original photo. Sorry. (eg: the sheet hanging behind the
bookcase is a light purple, and not a whitish-pink)